
How to Make a Fairy House: Easy DIY Guide for Beginners
Learning how to make a fairy house is one of those small DIY projects that can make a normal corner feel magical. You do not need expensive tools, perfect craft skills, or a big garden. A few sticks, stones, clay, moss, or even an old flower pot can become a tiny fairy home full of charm.
A fairy house is not just a decoration. It feels like a little story sitting in your garden, on your shelf, or beside a plant pot. Kids love it because it feels playful. Adults love it because it brings back that soft, simple feeling of imagination.
In this guide, you will learn how to make a fairy house in different easy ways. We will cover popsicle sticks, clay, cement, twigs, and fairy garden ideas. You can choose the method that fits your budget, time, and style.
Quick Answer: How Do You Make a Fairy House?
To make a fairy house, choose a strong base like a jar, flower pot, cardboard tube, popsicle stick frame, or small wooden box. Add walls, a roof, a tiny door, and small windows. Decorate it with moss, bark, pebbles, paint, clay, or twigs. If you want to place it outside, seal it with outdoor varnish or waterproof spray.
The basic steps are:
- Choose your fairy house base.
- Build the walls and roof.
- Add a small door and windows.
- Decorate with natural materials.
- Seal it if it will stay outdoors.
- Place it in a fairy garden, planter, or shelf display.
Why Fairy Houses Are So Special
A fairy house has a soft emotional feeling. It makes a small space feel alive. When you place one under a plant, near a tree, or in a garden pot, it looks like a tiny secret world is hiding there.
The best thing is that every fairy house looks different. One person may make a cute mushroom fairy house. Another may make a woodland cabin from twigs. Someone else may make a cement fairy house for the garden. There is no perfect or wrong way.
A fairy house is also a lovely project for families. Children can collect pebbles, leaves, and sticks. Adults can help with glue, cutting, and sealing. It becomes more than a craft. It becomes a memory.
Best Materials for a DIY Fairy House
Before you start, choose the right material. Some materials are better for indoor fairy houses, while others are better for outdoor fairy gardens.
| Material | Best For | Difficulty | Outdoor Friendly |
|---|---|---|---|
| Popsicle sticks | Beginners and kids | Easy | Medium if sealed |
| Air-dry clay | Cute details and small shapes | Medium | Low unless sealed |
| Cement or concrete | Strong outdoor fairy house | Hard | Very good |
| Twigs and bark | Natural woodland look | Easy to medium | Medium |
| Clay pot | Fast mushroom fairy house | Easy | Good if sealed |
| Cardboard | Indoor craft only | Easy | Not good for outdoors |
| Small jar | Recycled fairy house | Easy | Good if sealed |
If this is your first time, start with popsicle sticks or a small clay pot. If you want a fairy house for the garden, cement, wood, or a sealed clay pot will last longer.
You can also use our Free Decoration Tool according to your own style
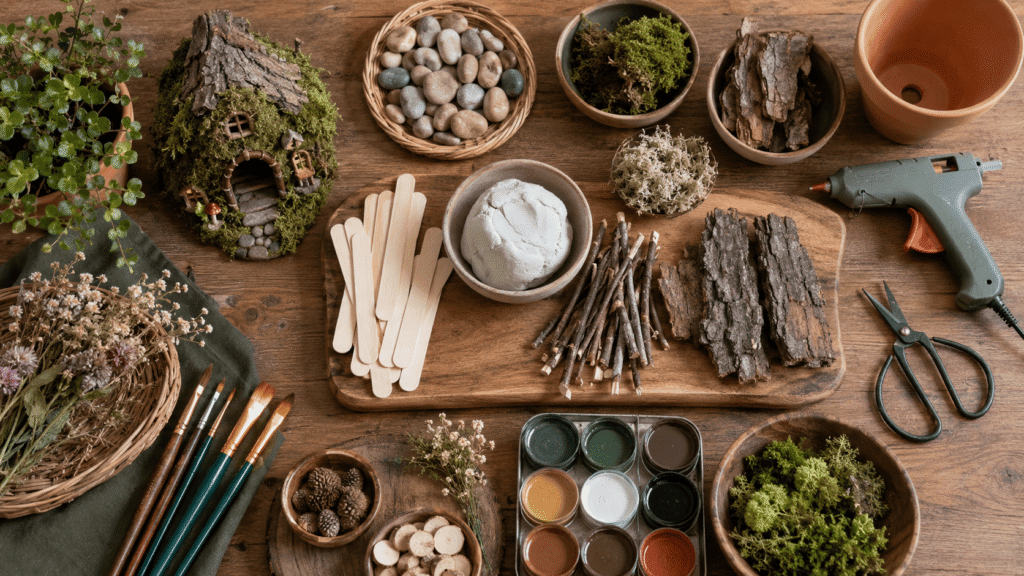
Supplies You May Need
You do not need all of these supplies. Pick the ones that match your fairy house style.
Basic supplies:
- Popsicle sticks
- Twigs
- Bark pieces
- Small stones or pebbles
- Air-dry clay
- Clay pot or small jar
- Hot glue gun
- Craft glue
- Acrylic paint
- Paint brushes
- Moss
- Small artificial flowers
- Cardboard for indoor projects
- Outdoor sealer or varnish
- Small scissors
- Craft knife
- Sandpaper
Safety note: If children are helping, an adult should handle hot glue, sharp tools, cement mix, and cutting.
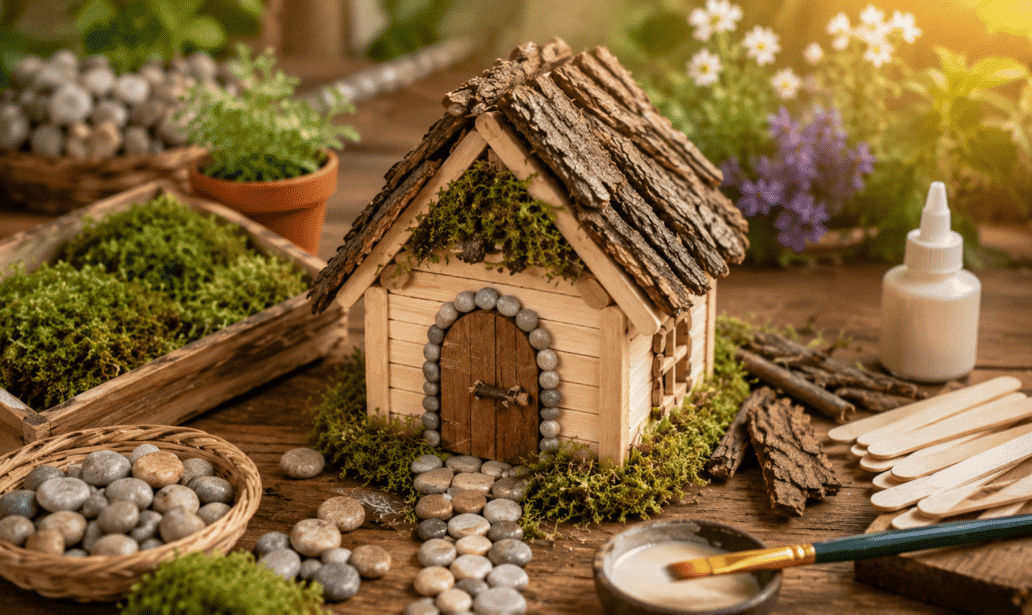
Method 1: How to Make a Fairy House with Popsicle Sticks
This is one of the easiest ways to make a fairy house. It is perfect for beginners, kids, and simple indoor decor.
What You Need
- Popsicle sticks
- Hot glue gun or strong craft glue
- Cardboard base
- Acrylic paint
- Small stones
- Moss
- Twigs
- Tiny flowers
Step 1: Make the Base
Cut a small square or rectangle from cardboard. This will be the floor of your fairy house. You can also use a small wooden coaster or a flat piece of thick card.
Keep the base small at first. A tiny fairy house is easier to control and decorate.
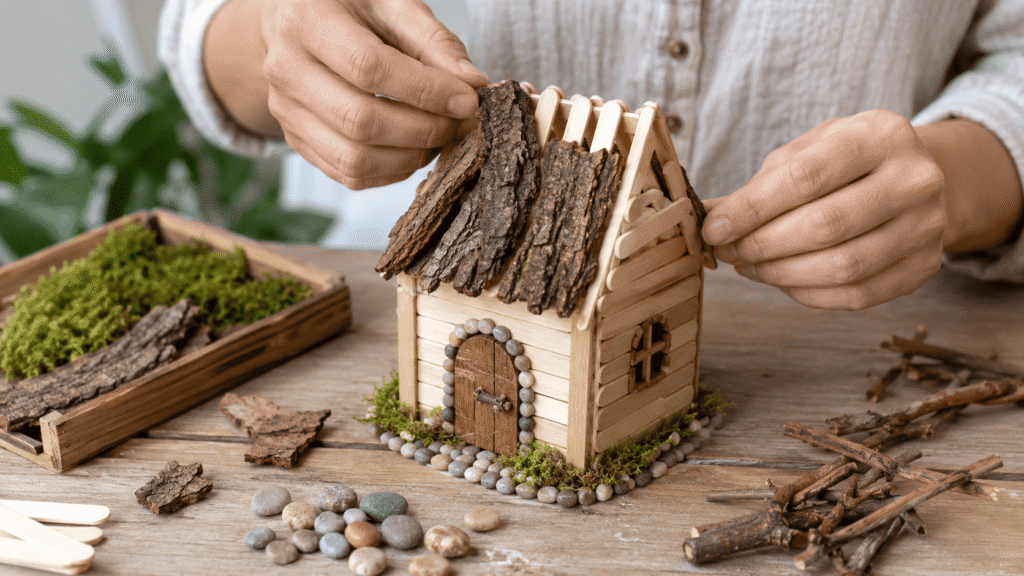
Step 2: Build the Walls
Lay popsicle sticks side by side to make one wall. Glue two sticks across them to hold the wall together. Make four small walls like this.
For the front wall, leave space for a tiny door. You can cut the sticks shorter or glue them around the door shape.
Step 3: Attach the Walls
Glue the walls together on the base. Hold each wall for a few seconds so it stays straight. Do not worry if it is not perfect. A fairy house looks more charming when it feels handmade.
Step 4: Make the Roof
Glue popsicle sticks together to make two roof panels. Attach them at an angle like a small cottage roof. You can also cover the roof with bark pieces, moss, or small leaves.
Step 5: Add Door and Windows
Use a small piece of cardboard, wood, or clay for the door. Paint it brown, green, blue, or any soft cottage color. Add tiny stones around the door to make it look magical.
You can draw small windows or make them from small stick frames.
Step 6: Decorate the House
Now comes the fun part. Add moss near the roof, pebbles around the base, and tiny flowers near the door. You can also add a small path using little stones.
This simple DIY fairy house is great for a shelf, kids’ room, plant corner, or indoor fairy garden.
You can aslo explore Bedroom Ideas
Method 2: How to Make a Clay Fairy House
A clay fairy house is perfect if you want a cute, rounded, storybook look. You can shape small doors, windows, mushrooms, bricks, and roof tiles with clay.
What You Need
- Air-dry clay
- Small jar, bottle, or foil ball as a shape
- Acrylic paint
- Paint brush
- Craft knife
- Water for smoothing
- Outdoor sealer if needed
Step 1: Choose a Shape
Use a small jar, plastic bottle, or ball of foil as the base shape. This helps your clay house stay round and stable.
If you want a mushroom fairy house, use a jar for the body and make a wide roof from clay.
Step 2: Cover the Base with Clay
Roll out the clay and gently wrap it around the base. Smooth the surface with your fingers and a little water.
Do not make the clay too thick. Thick clay takes longer to dry and may crack.
Step 3: Add Door and Windows
Use a craft knife or clay tool to make a small door shape. You can also add clay around the door to make a frame.
For windows, press small circles, hearts, or square shapes into the clay. Add tiny clay shutters if you want a cozy look.
Step 4: Make the Roof
For a mushroom-style fairy house, shape a round roof from clay. For a cottage look, make small roof tiles and press them one by one.
This part takes time, but it gives the house a beautiful handmade feel.
Step 5: Let It Dry
Air-dry clay usually needs time to dry fully. Leave it in a safe place for at least 24 to 48 hours, depending on thickness.
Do not paint it while it is still wet.
Step 6: Paint and Seal
Paint the house with soft colors. Good colors include warm brown, sage green, cream, red mushroom roof, soft pink, or dusty blue.
If the house will stay outside, use an outdoor sealer. Without sealing, clay can soften or break in rain.
You can also explore Living Room Ideas
Method 3: How to Make a Cement Fairy House
A cement fairy house is best for an outdoor fairy garden. It is stronger than cardboard or air-dry clay and can handle garden weather much better.
This method is a little harder, so it is better for adults or older teens.
What You Need
- Small plastic bottle, jar, or birdhouse shape
- Cement mix or concrete mix
- Water
- Gloves
- Small stones
- Wire mesh, optional
- Acrylic paint
- Outdoor sealer
- Old bowl for mixing
- Small craft tools
Step 1: Prepare Your Shape
Choose a small base shape. A plastic bottle or small jar works well. This will help create the body of the fairy house.
You can also use a small unfinished wooden birdhouse and cover it with cement mix.
Step 2: Mix the Cement
Wear gloves. Mix cement with water slowly until it becomes like thick paste. It should not be too watery.
Work in a place where mess is okay. Cement can be hard to clean once dry.
Step 3: Cover the House Shape
Apply cement around the base shape. Use your hands with gloves or a small tool. Try to keep the layer even.
Do not cover the door area fully. Leave space or press the door shape into the wet cement.
Step 4: Add Texture
Before the cement dries, press small stones into the walls. You can also make lines to look like bricks or old cottage stone.
A fairy house does not need smooth walls. Rough texture makes it look more natural and magical.
Step 5: Let It Dry
Let the cement dry fully. This can take 24 to 48 hours. Do not move it too much while it is drying.
Step 6: Paint and Seal
Paint the roof, door, and small details. Use outdoor acrylic paint if possible. Add an outdoor sealer for extra protection.
A cement fairy house looks beautiful near plants, under a tree, or beside a small pebble path.
You can also use Free Rug Size Calculator
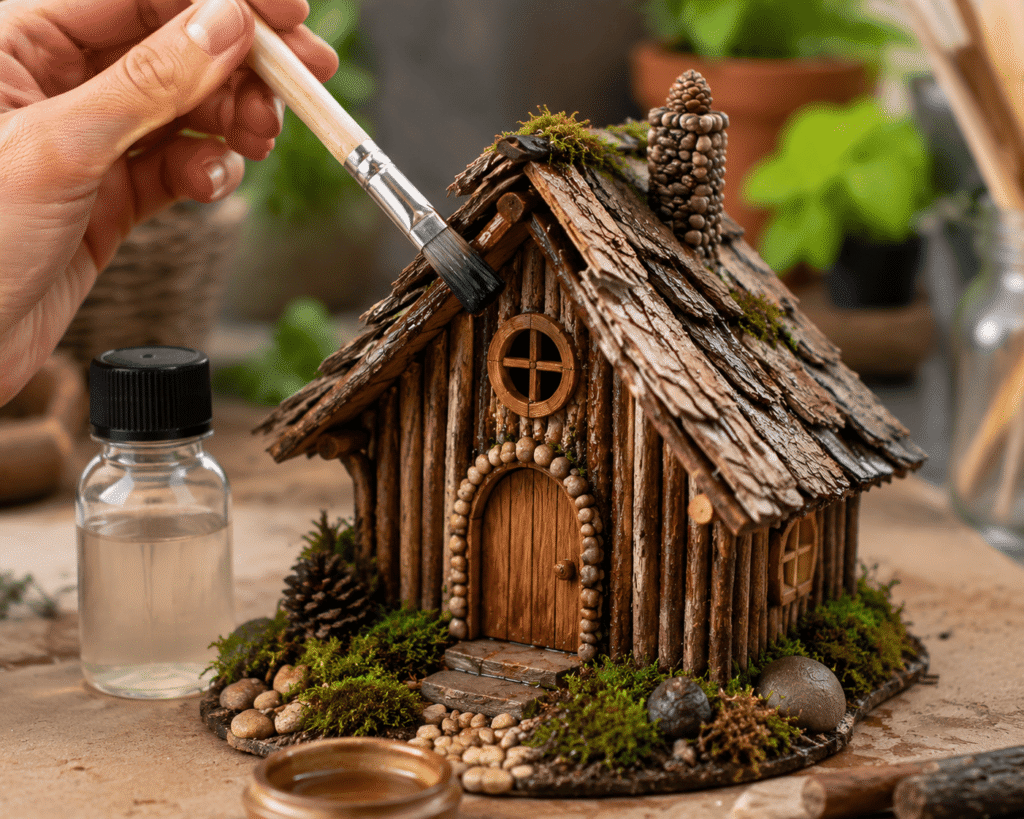
Method 4: How to Make a Fairy House Out of Twigs
A twig fairy house has a natural woodland look. It feels like something a fairy would actually build in the forest.
This method is also low-cost because you can collect many materials from your yard or garden.
What You Need
- Twigs
- Bark pieces
- Hot glue gun
- Cardboard or wooden base
- Moss
- Small pebbles
- Tiny leaves
- Small pinecones or acorns
Step 1: Collect Natural Materials
Collect dry twigs, small bark pieces, acorns, and pebbles. Try to choose clean and dry materials.
Do not use wet twigs because they may shrink or grow mold later.
Step 2: Make a Simple Frame
Use cardboard or small wood as the base. Glue twigs upright to make the walls. You can place them side by side like a tiny log cabin.
For a stronger house, glue two horizontal twigs across the back of each wall.
Step 3: Build the Roof
Use bark pieces for the roof. Bark gives a very natural cottage feel. You can also use small flat twigs, dry leaves, or moss.
Make sure the roof is not too heavy. A heavy roof can break weak twig walls.
Step 4: Add a Door
Make a small door from bark or tiny sticks. Glue two small twigs across it to hold it together.
Add a tiny pebble as a door handle. This small detail makes the house feel real.
Step 5: Add Moss and Pebbles
Glue moss around the base and roof. Add a pebble path in front of the door.
A twig fairy house looks best when it is not too perfect. Let it feel wild, soft, and natural.
You can also explore Kitchen Decor Ideas

Method 5: How to Make a Fairy Garden House
A fairy garden house is usually made to sit inside a planter, garden bed, or small container. The house is only one part of the full fairy garden scene.
What You Need
- Small fairy house
- Planter, tray, or garden corner
- Soil
- Moss
- Pebbles
- Mini plants
- Tiny fence, optional
- Small pathway stones
- Mini decorations
Step 1: Choose a Container or Garden Spot
You can make a fairy garden in a big flower pot, wooden tray, old basket, or directly in the garden.
If you use a container, make sure it has drainage holes. Plants do not like water sitting at the bottom.
Step 2: Add Soil and Plants
Add soil and small plants. Good choices include moss, baby tears, small succulents, thyme, or miniature ferns.
Keep the plants small so they do not hide the fairy house.
Step 3: Place the Fairy House
Place the fairy house near the back or side of the container. This makes the garden look deeper.
Do not bury the house too much in soil. Keep it slightly raised so water does not damage the bottom.
Step 4: Add a Path
Use tiny pebbles to make a path from the edge of the pot to the fairy house door. This small path makes the whole scene feel like a tiny village.
Step 5: Add Final Details
Add a tiny bench, small fence, mini mushrooms, little flowers, or a small sign. Do not overcrowd the space. A few cute details are enough.
How to Make a Fairy House and Garden Together
If you want a full magical setup, make the fairy house and garden together from the start.
Start with the house first. Choose the material based on where you will place it. For indoor planters, popsicle sticks or clay are fine. For outdoor gardens, cement, sealed wood, or sealed clay pot is better.
Then plan the garden around the house. Think of it like a small front yard. Add a path, a few plants, and one or two small decorations.
A good fairy garden has balance. The house should be the main focus. The plants and decorations should support it, not hide it.
Simple fairy house and garden layout:
- Fairy house at the back
- Pebble path in the center
- Moss on both sides
- Small plants around the edges
- Tiny bench or mushroom near the door
- Small stones to create a border
This kind of setup looks beautiful on a patio, balcony, windowsill, or garden corner.
How to Weatherproof an Outdoor Fairy House
If your fairy house will stay outside, this step is very important. Rain, sun, and soil moisture can damage many craft materials.
Use Outdoor Glue
Hot glue is easy, but it may not last long outside. For outdoor fairy houses, use waterproof craft glue, wood glue, or strong outdoor adhesive.
Seal the House
Use outdoor varnish, clear acrylic sealer, or waterproof spray. Apply it after paint is fully dry.
Seal the roof, walls, base, door, and any painted details.
Keep It Above Wet Soil
Do not place the fairy house directly in wet mud. Put it on small flat stones, a wooden base, or a raised platform.
This helps stop moisture from damaging the bottom.
Avoid Paper and Cardboard Outside
Cardboard is fine for indoor fairy houses, but it will not survive rain. If you made a cardboard fairy house, keep it indoors.
Protect Clay
Air-dry clay is not naturally waterproof. It must be sealed properly. Even then, it is better to keep clay houses in a covered outdoor area.
Fairy House Decorating Ideas
Once the basic house is ready, decorations make it special. These little details bring emotion and personality to your fairy house.
Try these ideas:
- Add a round red mushroom roof.
- Make a tiny door from bark.
- Use a pebble as a door handle.
- Add moss around the roof.
- Make a tiny chimney from a small stone.
- Use acorns as garden decorations.
- Add a pebble path.
- Paint soft flowers around the windows.
- Add a tiny welcome sign.
- Use small solar fairy lights nearby.
- Make a mini fence from toothpicks.
- Add tiny clay mushrooms.
- Use bark pieces as roof shingles.
- Add small beads as window lights.
Do not try to add everything at once. A fairy house looks better when it has a clear style. Choose woodland, mushroom cottage, stone cottage, garden home, or pastel storybook style.
Easy Fairy House Ideas for Kids
Kids love fairy houses because they feel like tiny secret homes. Keep the project simple and safe for them.
Good kid-friendly ideas:
- Popsicle stick fairy house
- Painted clay pot fairy house
- Paper roll fairy house for indoor play
- Stone and moss fairy garden
- Small jar fairy lantern house
Let kids choose the colors. Their fairy house may not look perfect, but it will feel personal. That is the beauty of this project.
For younger children, prepare the base first. Let them paint, add stickers, place moss, and decorate with pebbles.
Common Mistakes to Avoid
Using Weak Materials Outside
Cardboard, paper, and unsealed clay can break quickly outside. Use stronger materials or keep delicate houses indoors.
Making the Roof Too Heavy
A heavy roof can break small walls. Use lightweight bark, thin sticks, or clay only when the base is strong.
Not Letting Paint Dry
If you seal the house before the paint dries, the finish may look cloudy or sticky. Let paint dry fully first.
Using Too Much Glue
Too much visible glue can make the house look messy. Use small amounts and hide glue spots with moss or stones.
Forgetting Drainage
If your fairy garden is in a pot, drainage is important. Without drainage, plants may die and the house may get damaged.
Overdecorating
Too many decorations can make the fairy garden look crowded. Keep some empty space so the tiny house can shine.
Best Places to Put a Fairy House
You can place a fairy house in many places around your home.
Good spots include:
- Under a small tree
- Inside a plant pot
- On a balcony
- Near a garden path
- On a windowsill
- On a bookshelf
- In a child’s bedroom
- In a small indoor planter
- Beside a patio chair
- In a cottagecore decor corner
For outdoor fairy houses, choose a place with partial shade. Too much direct sun can fade paint.
Final Thoughts
Making a fairy house is a small project, but it can bring a lot of joy. It turns simple things into something magical. A twig becomes a wall. A pebble becomes a door handle. A little moss becomes a soft garden carpet.
The best fairy house is not the most perfect one. It is the one that feels like you. Maybe it looks like a woodland cabin, a mushroom cottage, a stone garden house, or a tiny clay home. Each one tells its own little story.
So gather a few simple materials, choose your favorite method, and start building. Once your fairy house is finished, place it somewhere special and let it quietly add a little magic to your home or garden.
FAQs About Making a Fairy House
What is the easiest way to make a fairy house?
The easiest way is to use popsicle sticks or a small clay pot. Popsicle sticks are simple to glue together, and a clay pot can quickly become a mushroom-style fairy house with paint and small decorations.
What can I use to make a fairy house?
You can use popsicle sticks, twigs, bark, air-dry clay, cement, pebbles, moss, small jars, clay pots, and recycled containers. For indoor fairy houses, cardboard is also fine. For outdoor fairy houses, use stronger materials and seal them.
How do you make a fairy house waterproof?
To make a fairy house waterproof, use outdoor glue, outdoor acrylic paint, and a clear outdoor sealer. Also place the fairy house on small stones or a raised base so it does not sit directly in wet soil.
Can I make a fairy house without clay?
Yes, you can make a fairy house without clay. Use popsicle sticks, twigs, bark, a small jar, a clay pot, wood, or cement. Clay is only one option.
How do you make a fairy garden house?
To make a fairy garden house, first build or buy a small fairy house. Then place it in a planter or garden area with soil, moss, miniature plants, pebbles, and a tiny pathway. Add small decorations like mushrooms, fences, or little flowers.
What plants are best for a fairy garden?
Small plants are best for fairy gardens. You can use moss, baby tears, small succulents, thyme, miniature ferns, or tiny flowering plants. Choose plants that stay small and match your light conditions.
Can kids make a DIY fairy house?
Yes, kids can make a DIY fairy house with safe materials like popsicle sticks, clay pots, paint, moss, and pebbles. Adults should help with hot glue, cutting tools, cement, and outdoor sealers.
How long does it take to make a fairy house?
A simple fairy house can take 30 minutes to 2 hours. Clay and cement fairy houses take longer because they need drying time. If you are painting and sealing the house, the full project may take one or two days.
Can a fairy house stay outside?
Yes, a fairy house can stay outside if it is made from outdoor-friendly materials and sealed properly. Cement, sealed wood, sealed clay pots, and stone fairy houses work best outside.
What is the best style for a fairy house?
The best style depends on your taste. Popular styles include mushroom cottage, woodland twig house, stone fairy house, clay cottage, and garden fairy house. Choose the style that feels most magical to you.